Plumbing work in this business is usually not a big deal. It’s simple and straight-forward and usually follows this sequence:
- Cut out offending PVC (broken/bad leaking stuff).
- Obtain new fittings from local supplier or Home Depot.
- Using PVC Primer (the clear not purple stuff), and heavy bodied PVC cement, prepare fittings and pipe/flex hose and install the replacement.
- If it’s cold out, warm up the joints and parts with a heat gun…. (NOT hot).
- Wait ample time for the PVC cement job to complete it’s cure cycle.
- Fill up spa and test under pressure.
Many times though, it’s not this simple, and you really need to try to figure out a much different way to solve the problem. (Take that to mean the cure could be worse than the disease).
Case in point. 1990’s model Sundance spa. Nice spa, really nice thru the deck installation and has been a family treasure for many years. Using common sense and intuition, it was determined that the leak that was draining the spa down 2-3 inches per day was located in a specific corner area of the tub. For the uninitiated, this model of Sundance spa is a full foam tub, which means that you’ll need to dig through a lot of foam to find the leaking pipe. Squirrels had moved into this spa and dug out a ton of foam, so it was initially thought that the squirrels had dug through the foam, found a specific pipe and chewed a hole in it.
I don’t like having to trouble-shoot leaks in full-foam hot tubs. They can really be resource hogs. But the water soaked foam in the area I was digging was soft and easy to remove. Yes it was really messy and not fun but digging with a crow-bar worked well. Eventually the leak was found and it was in a really tough area, with tight parameters for ‘fit-ment’. I mean, there’s just no way to cut out the bad stuff and just insert some new stuff and the leak is gone.
Here’s what it looked like, the spa was leaking at the blue glue area (top of the image) where the PVC connector meets up with the tan colored flex-PVC:
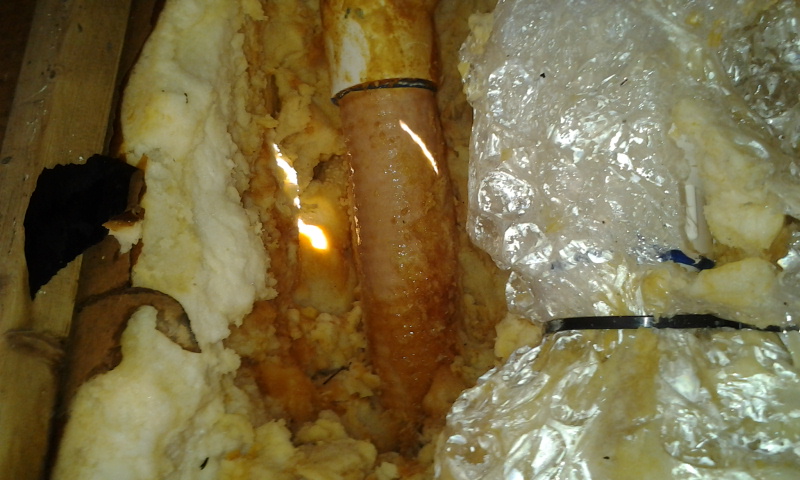
Going the conventional route, the standard answer to this situation is cut it all out, and replace the fittings and all that it connects to. But in this situation you just can’t do that. If you’ve ever worked with older flex PVC, you’ll know it doesn’t flex anymore, that’s 1. 2 is that everything else that it connects to are proprietary fittings/devices – like a Sundance diverter valve that controls which jets get the most water flow. There’s nothing wrong with those things so they need to stay in place, and 3 – omg, the foam man the foam! Everything is fixed in place by this stuff so you don’t have the liberty of moving stuff around to make it fit with new PVC.
So what do you do? Cut it out and start a nightmare of a ride to nowhere or just try to fix the leak without all that insanity?
I like simple solutions. In this case, we decided to use an old-fashioned approach with a bit of a twist. They do make PVC repair couplings/fittings for this purpose, but they are hard to find, especially in the 2″ variety like this one was. I took a 2 inch PVC coupler, and cut it in half. Then I cut it in half again. The end result was this:

The leak was a lot of water coming out of the edge of the 2 inch fitting, so the idea was to target THAT. This fitting that was created out of a 2 inch PVC coupler from Home Depot was designed to butt-up next to the leaking PVC fitting in the spa, and it’s size, with good preparation and PVC cement, would stop the leak completely. With this repair option you’ve got a PVC fitting edge butting up next to the edge of the existing PVC fitting that’s in place. Hmmm what about that tiny gap between the edges of the fittings? Well I decided to do the standard leak repair (on top of the repair) by using Plast-Aid. So, I’ve got a new half-circle 2 inch PVC fitting up against the old 1990’s 2 inch fitting, with a lot of good prep work, (drill wire brush to clean, along with PVC Primer), It’s all sealed with medium or heavy bodied PVC Cement. In this case I used “Weld-On” Brand Hot PVC Cement.
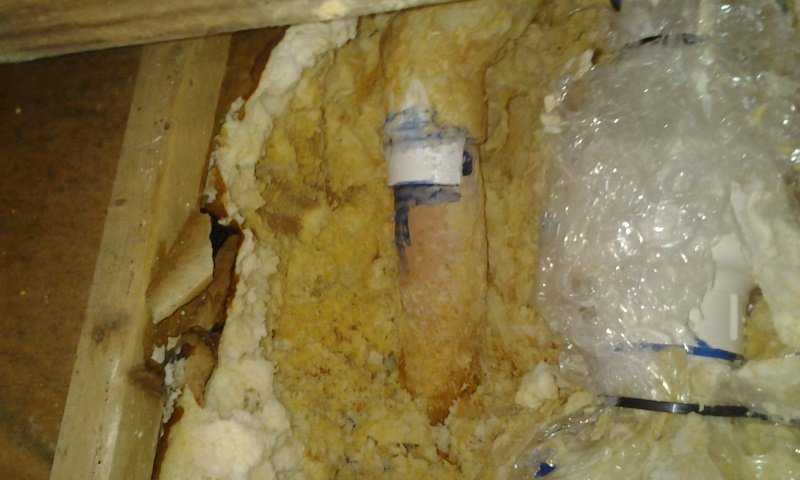
It is not a pretty job. But you can see the Plast-Aid over the top of the edge where the two PVC fittings meet. It looks like blue and white mixed together.
The end result was a complete success! A lot of money was saved using this method of fixing a hot tub leak.
And that’s just one of the more difficult jobs that we face daily. Each job can be a challenge! If you have a problem with your hot tub and don’t know what to do just give us a call anytime!
![]() We can help you!
We can help you!